
Checking the Alternator Belt's Deflection :-
It is essential to check the alternator belt's deflection fairly frequently and should never be ignored. If it is broken then it must be replaced immediately!!
The alternator belt drives the alternator its self and the fan inside the fan housing, which is essential to cool the engine down (hence aircooled engine).
If the alternator belt is too slack, worn out, cracked or broken, the ignition light (on the left hand side of the speedometer) will be lit. The battery at this point would not charge and the engine will also overheat due to the fan not running.
The deflection of the alternator belt should be between 11mm to 14mm with light thumb pressure (as shown in the picture above). If a new alternator belt is to be installed then the deflection of it should be between 9mm to 11mm.
Do not over-tighten the alternator belt !! If you do so then you may cause the alternator to prematurely wear out and loss of engine power. This would be the result of increased load on the alternator and the engine's crankshaft.
Alternator Belt Adjustment:-
To adjust the alternator belt, you will require the following tools:-
- 21mm socket
- Torque Wrench (adjustable)
- Short Extension Bar
- Large Flat Blade Screwdriver or Oil Filter Wrench
- Ruler (in mm)
Remove the 21mm nut from the alternator its self. This can be done by wedging a large flat blade screwdriver in the alternator's cooling fins and undoing the 21mm nut with the torque wrench and the short extension bar as shown in the photo below:-
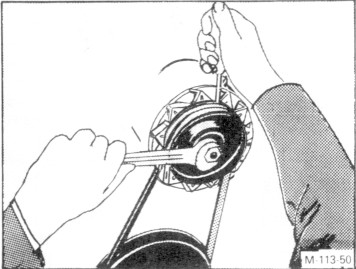
If however the alternator does not have any cooling fins (in the case of my car since I had to replace mine) then you can grip onto the alternator's pulley with an oil filter wrench (but do not grip onto the belt its self !!).
The alternator belt's tightness can now be adjusted by means of removing the shims from between the two alternator pulley halves to the outside part of the pulley its self as shown below:-
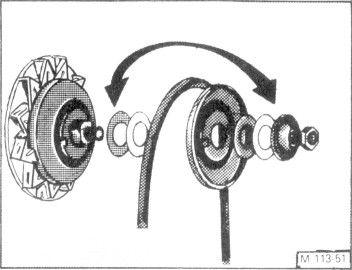
Now re-assemble the alternator's pulley wheels as shown above and turn the alternator's pulley wheel with the 21mm socket and a ratchet for at least 1 revolution. This will initially install the alternator belt correctly. Do not use a screwdriver to force the belt onto the alternator's pulley otherwise the belt its self may break or be strained in the process !!.
Now wedge the alternator's cooling fins (or grip onto the alternator's pulley wheel with an oil filter wrench) and tighten up the alternator's pulley nut to 43 lbs ft (approx 58 Nm).
Now check the alternator belt's adjustment and repeat this procedure if necessary and make sure that it is between 11mm to 14mm (or 9mm to 11mm for a brand new alternator belt).
The german version of this documentation was originally written by Udo Oelmann (N° 58) and has been translated (in my own words) by myself, Phil Ade (N° 114) on Wednesday 18th January 2006.